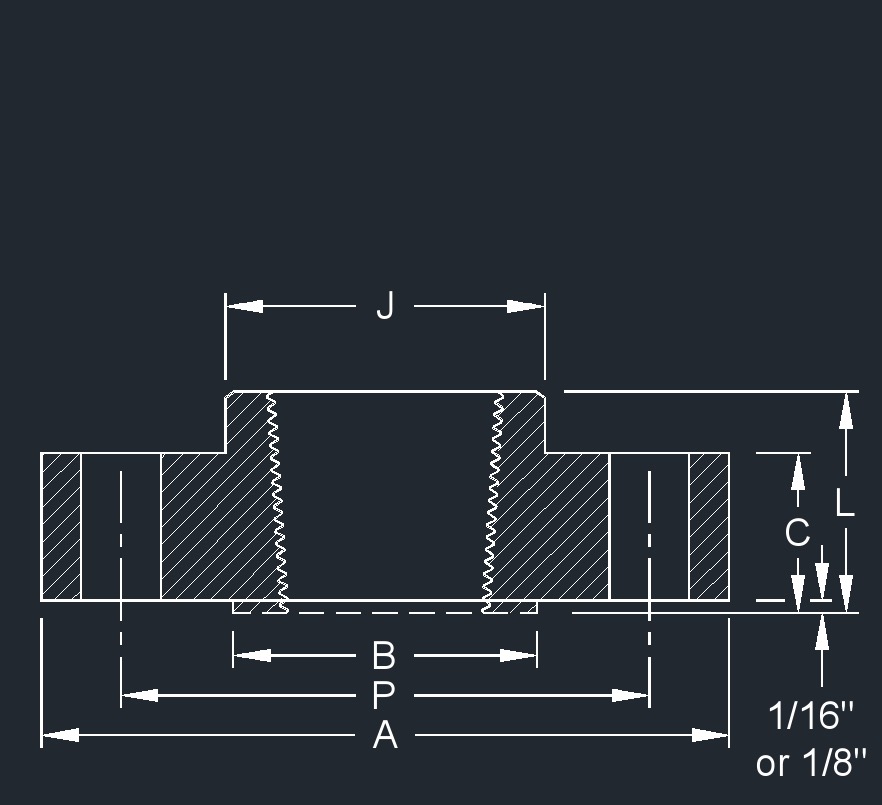
Flange - Threaded, ANSI Class 250, B16.1, DI (in)
Flange - Threaded, ANSI Class 250, B16.1, DI (in) | |||||||||
|---|---|---|---|---|---|---|---|---|---|
| Pipe
Size (NPS) | Outside
Diameter of Flange A | Diameter
of Raised Face B | Thickness
of Flange
| Diameter
of Hub at Base
| Length
of Hub
| Number
of Bolt Holes | Diameter
of Bolt Holes | Bolt
Circle Diameter
| Approx.
Weight |
| 4 | 10 | 6 15/16 | 1 1/4 | - | - | 8 | 7/8 | 7 7/8 | - |
| 6 | 12 1/2 | 9 11/16 | 1 7/16 | - | - | 12 | 7/8 | 10 5/8 | - |
| 8 | 15 | 11 15/16 | 1 5/8 | - | - | 12 | 1 | 13 | - |
| 10 | 17 1/2 | 14 1/16 | 1 7/8 | - | - | 16 | 1 1/8 | 15 1/4 | - |
| 12 | 20 1/2 | 16 7/16 | 2 | - | - | 16 | 1 1/4 | 17 3/4 | - |
| 14 | 23 | 18 15/16 | 2 1/8 | - | - | 20 | 1 1/4 | 20 1/4 | - |
| 16 | 25 1/2 | 21 1/16 | 2 1/4 | - | - | 20 | 1 3/8 | 22 1/2 | - |
| 18 | 28 | 23 5/16 | 2 3/8 | - | - | 24 | 1 3/8 | 24 3/4 | - |
| 20 | 30 1/2 | 25 9/16 | 2 1/2 | - | - | 24 | 1 3/8 | 27 | - |
| 24 | 36 | 30 5/16 | 2 3/4 | - | - | 24 | 1 5/8 | 32 | - |
| 30 | 43 3/4 | 37 3/16 | 3 | - | - | 28 | 2 | 39 1/4 | - |
| 36 | 50 | 43 11/16 | 3 3/8 | - | - | 32 | 2 1/4 | 46 | - |
| 42 | 57 | 50 7/16 | 3 11/16 | - | - | 36 | 2 1/4 | 52 3/4 | - |
| 48 | 65 | 58 7/16 | 4 | - | - | 40 | 2 1/4 | 60 3/4 | - |
- Raised face flanges are available upon request.
- Flanges may be back or spot faced for compliance with flange thickness tolerances.
- Pipe face-to-face dimensions conform to a tolerance of ± .12" for sizes 4"- 48". Fittings face-to-face dimensions conform to a tolerance of ± .06" for sizes 4"-10" and ± .12" for sizes 12"- 48". The largest opening governs the tolerance for all openings. Center-to-face tolerances are one half the face-to-face tolerances.
- The bolt circle and bolt holes of the above flanges match those of Class 250 flanges shown in ANSI/ASME B16.1.
- Class 250 flanges do not match and can not be joined with Class 125 flanges shown in ANSI/ASME B16.1. Class 250 flanges are compatible with Class 300 flanges.


